 Up
Up
|
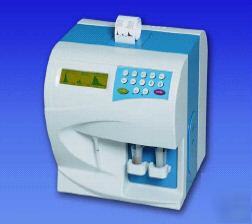
Cellscan 13 haematology analyser is a semi-automatic cell counter for in vitro diagnostic use, developed for small to medium size labs. It is intended to determinate the following 13 parameters from 20 ml of whole blood: - HGB, RBC, HCT, MCV, RDW, MCH, MCHC The instrument sends the results to an internal printer and, if connected, to a properly interfaced host computer. Cellscan 13 haematology analyser consists of three main parts: - Fluidic system: performs aspiration, sampling, dilution and generates regulated air pressure and vacuum. - Data processing system: counts and measures the parameters, generates results and histograms. - Control panels: includes display, keyboard, internal printer and serial interface - visualisation of the final reading results (with RBC, WBC and Plt graphs togheter or with each graph separately); - visualisation of eventual warning or error messages; - visualisation of every step of the operations. - To visualise the thresholds that the operator can increase or decrease with the keys « » or «¯» . - To increase values in the calibration program, values of thresholds or ID number, or to manually move threshold in WBC or Plt graph. - To decrease values in the calibration program, values of thresholds or ID number, or to manually move threshold in WBC or Plt graph. - To perform the background count reading and to reset to zero (blank) the photometer for the haemoglobin reading. - To enter or exit from the calibration program and visualise all the parameters in this program; to visualise veterinary thresholds in threshold program. - To remove eventual capillary obstructions and enter in the INSIDE FILLING procedure. - To clear the memory from previous calibrations, in the calibration program. - To start the printer manually or to visualise reading times in the calibration program. - To perform a reading of a sample and to interrupt it (by pressing it a second time, during the reading). - To confirm parameter variations in the calibration program or threshold values. 2.2 REAR PANEL – CELLSCAN 13 2.5 ISOTONIC SOLUTION CONSUMPTION The basic method used in the reading system is an aspiration capillary tube with a calibrated hole, immersed in a conductive isotonic solution in which blood cells are diluted. Two electrodes are placed inside and outside the aperture through which a current is stabilised. The suspension of the globules flows into the capillary tube from the chamber through the aperture, because of the negative force generated by a special hydraulic system. As the blood cells pass through the aperture, the resistance between the two electrodes is altered. This variation is then converted into impulses, whose amplitude is proportional to the cells volume. The Hgb lysing solution, manually added to the WBC dilution, produces the lysis of the red blood cells; the haemoglobin released combines with the cyanide, forming a stable cianmetahaemoglobin compound, which is photometrically read at 546 nm. Cellscan 13 can determinate the following parameters: RBC - red blood cell or erythrocytes (expressed in millions of cells per ml of blood: 106/mm3) WBC - white blood cell or leukocytes (expressed in thousand of cells per ml of blood: 103/mm3) HGB - haemoglobin (expressed in concentration: g/dl) HCT - hematocrit (percentage of total volume) MCV - erythrocytes mean corpuscular volume (expressed in microns cubed: mm3) PLT - platelet (expressed in thousands of cells per ml of blood: 103/mm3) MPV - platelet mean corpuscular volume (expressed in microns cubed: mm3) PCT - thrombocrit (percentage of total volume) MCH - corpuscular haemoglobin (expressed in picograms) MCHC - corpuscular haemoglobin concentration (in g/dl) RDW - red blood cell volume distribution (c. v. %) PDW - platelet volume distribution (c. v.) LYMPH% - lymphocytes percentage (only for human blood) For correct use of the instrument, use the STARTING KIT which contains: Gernoton 5 L(isotonic solution) Gernolyser 20 ml (lysing solution) If some of the packing elements are absent or defective, please contact your distributor. Please, save the packing for an eventual return. Following are the steps for the initialisation procedure: - Place Cellscan 13 in a clean room, on a solid working table, out of direct sunlight which could change the operative temperature of Cellscan 13 and its reagents. - Make sure Cellscan 13 is on a flat, horizontal surface. - Avoid subjecting the instrument to jerks and vibrations. - Connect the power cable to a grounded AC wall outlet preferably not shared with other electric appliances, and with less than 10% fluctuation of the line voltage compared to the standard voltage specified. Excessive voltage fluctuation requires a surge protector. - Keep the instrument away from other appliances generating high levels of electrical noises (e.g. radiological instrument ). Before switching the instrument on, the following steps must be carried out: REPLACEMENT OF THE PERISTALTIC PUMPS RED TUBES Now it is possible to access to the lateral hydraulic circuit. - Place the red tubes, paying attention to set the white plastic connectors in their slots correctly. Before connecting the power cable, check to see if the AC power supply is the same value reported on the label on the instrument. - Do not connect to an AC power supply different from that indicated on the label. - Make sure that the instrument is switched off before connecting the power. Do not, for any reasons, power the instrument from an electrical outlet without a ground connection. The capillary is the most important element of the cell counter, because the microhole for the blood aspiration is located here. On the front panel you will find (on the right side) two capillary holders. The WBC capillary holder is located on the left side and the RBC/Plt capillary holder is located on the right side. In the package the two capillaries are in two bottles, with different labels: RBC/Plt and WBC. The teflon tube for the Hgb aspiration is close to the WBC capillary. IT IS IMPORTANT NOT TO EXCHANGE THE POSITIONS OF THE CAPILLARIES: THIS MISTAKE COULD COMPROMISE Follow these steps to correctly assemble the capillaries: - Take the capillaries from the bottles (pay attention to the labels and remember that the WBC capillary will be located in left position and the RBC/Plt one will be located in right position); - Make sure that the black O-ring is on the upper part of the capillary, in the correct position. - Insert the metallic thread in the hole as shown in the picture, in order to insert it also into the steel tube located inside the capillary - Fix the capillary to its capillary holder as shown in the picture; - Insert the two ring nuts, screwing them in their original position, in order to firmly block the capillaries to their capillary holders. On the rear panel there are located : - the isotonic solution hydraulic connection (IN); - the waste hydraulic connection (WASTE). 4.5.1 Connecting reagent container - Connect the isotonic solution hydraulic connection, on the rear panel, to the PVC tube coming out from the isotonic solution tank. - Connect the waste hydraulic connection, on the rear panel, to the PVC tube coming out from the waste tank. 4.5.2 Connecting the instrument to a host computer Cellscan 13 has a built-in serial communication protocol that makes possible the connection between the analyser and a host computer. The following scheme is the connection diagram. 4.6 INSERTING THE PRINTER PAPER Open the printer paper housing, on the top of the instrument, and place the paper roll using the little white lever. - In vertical position, the lever allows the paper roll introduction. - In horizontal position, the lever blocks the paper roll in the printing position. Now it is possible to turn the instrument on. When the instrument is switched on, the display shows the message «STARTING» and, subsequently, the message «WASHING». At this time, fill the diluter hydraulic circuit by pressing 1/500 or 1/100 key and then, place a cup of isotonic solution, filled by the diluter, under each capillary. When the instrument is switched on, it performs the initialisation showing the messages «STARTING» and, subsequently «WASHING». The instrument has two thresholds in its memory. The first one represents the lowest value of the volume in mm3 for RBC readings, the second one represents the lowest value of the volume in mm3 for WBC readings. Both thresholds are automatically programmed. Pressing the key «THRES» (threshold) it is possible to enter in the thresholds management program to change their values. To select a different threshold, follow this procedure: - The pointer is on the left side of the RBC note: use keys « » and «¯» to increase or decrease the numerical number of RBC threshold. - Press again the «THRES» key. The pointer now is on the right side of the “aut script, in the same display line: the operator can choose between the automatic (“aut) or (“fix) threshold. In the “aut mode, the instrument automatically will calculate the threshold between the Plt and RBC graphs; in the “fix mode, the threshold value calculated by the instrument is always the settled one (if there is a significant difference between the settled threshold and the real one, the instrument gives a warning message). RAL suggests to use the “aut threshold. - Pressing «THRES» again, follow the same procedure for the WBC threshold (in this case the instrument only works with the “fix threshold). - Press «SAMPLE» or «ENTER» to save and proceed. Now the selected thresholds are active and printed by Cellscan 13. With Cellscan 13 it is also possible to work in veterinary mode. A part from the human thresholds, the instrument has stored for three species more: cat, dog and horse. By pressing the key «THRES», the operator can visualise the selected thresholds, and then, by pressing the «CAL» key it is possible to display the other thresholds stored. With the two arrows keys the operator can select the wanted thresholds and confirm the choice by pressing the «ENTER» key. When on the display appears RBC=0.0, MCV=0.0, Plt=0, MPV =0.0, WBC=0.0, Hgb=0.0, perform a first control of the instrument, with fresh isotonic solution under the capillaries, by pressing the «CHECK» key. The display, if the reading is correct, will show the following results: RBC=0.0, MCV=0, Plt=0, MPV =0.0, WBC=0.0, Hgb=0.0. For Hgb reading Check values different from 0 in a range of ± 0,2 can be accepted. The acceptable value for platelet is <20000/mm³, in this phase. During the Checking procedure make sure that the Hgb tube is correctly inserted in the isotonic solution (fill the cup abundantly): if in this phase the tube aspires air or a bubble solution, all the following Hgb readings will be certainly compromised! Checking procedure foresees the following functions: - Calibration of the haemoglobin photometer performing a photometrical zero with the isotonic solution. - Checking of the level of pollution of the isotonic solution. Bacteria with dimensions comparable to blood cells could grow in the isotonic solution tank. The instrument will notice a high background count and the display will visualise the correspondent warning message. - Revelation of the presence of electrical interference. The positive electrode is externally located and exposed to eventual electrical interference, which can alter the reading by causing a higher background counting. This kind of problem can occur because of poor functioning of the ground line caused by damage or bad connection. These problems could also be caused by a monitor, a radiological instrument, etc… - Control of the presence of aspirations from holes in the hydraulic circuit. If with Checking procedure you obtain the expected values, without the presence of warning or error messages, you can proceed with the normal analysis of the dilute sample. Checking procedure must be performed every time the instrument is switched on, as the first step of your work: the lack of execution or bad execution of this step would mean poor functioning of the haemoglobin reading apparatus. In order to perform the counting of red and white blood cells of the sample, the operator has to dilute the blood sample in the following way: - 1:500 for the white blood cells reading - 1:50000 for the red blood cells reading The dilutions are prepared by means of the diluter, which is incorporated in the cell counter. - Take a blood testing tube and place it under the diluter tip. - Press the 1:500 key. The diluter aspirates 20 ml of blood. Pay attention: during the aspiration, the testing tube must be kept perfectly still. - Clean the diluter tip with little paper handkerchief (do not use cotton or tissue handkerchiefs), paying attention not to scatter blood drops from the inner diluter tip part: this contamination could alter the dilution. - Place a clean cup under the diluter tip. Press the key 1:500 again and collect the diluted blood sample in the cup, gathering the drops that may have been scattered on the cup walls. Do not keep the diluter tip immersed in the solution during the liquid distribution. Be careful to maintain the cup in an inclined position to avoid air bubbles formation. In this way the 1:500 dilution which is used for WBC reading and for the following preparation of the RBC dilution is prepared. - Take the previously 1:500 diluted sample and place it under the diluter tip. - Press the 1:100 key. The diluter aspirates 100 ml of the sample obtained from the first dilution. Remember to gently shake the first dilution cup before, because cells could have settled on the bottom. - Clean the diluter tip carefully, paying attention not to scatter dilution from the inner diluter tip part: this contamination could alter the dilution. - Collect the dilution in an empty cup by pressing the 1:100 key again. Be careful with air bubbles formation. In this way the 1:50000 solution required for the red blood cell counting has been obtained. Now the sample reading can start. TO OBTAIN ALL 13 PARAMETERS IT IS NECESSARY TO WORK WITH THE TWO CAPILLARIES AT THE SAME TIME - Add 4-5 drops of lysing solution to the 1/500 dilution cup. This operation allows the red blood cells lysis and the Hgb reading. - Gently agitate the sample for about 15 seconds. - Put the 1/500 cup dilution on the bracket under the WBC capillary. Put the 1/50000 dilution cup on the bracket, under the RBC/Plt capillary. After ~20 seconds the results will be displayed and printed out. If an error occurs during the reading, the printer will not print the result automatically out: in this case the «PRINT» key can be pressed, if it is wanted to be printed out. Sometimes, especially in case of partial or total obstructions, it is important to know the reading time for each capillary. If this information is required, the operator can enter in calibration mode (as usual, by pressing the «CAL» key) and then, by pressing the «PRINT» key, the instrument shows the reading times for RBC and WBC capillaries. The correct reading times for Cellscan 13 must be between 7 sec and 11 sec. In case of shorter or longer reading times, the instrument shows error messages (11,12,21,22). The calibration can be checked daily, but if the instrument is correctly used, this calibration is not necessary. Cellscan 13 permits a new calibration through use of a control blood with known values, operating in this way: - Mix very well the control blood sample, and be sure it is at room temperature. - Prepare the two dilutions of control blood . - Perform a reading and control the parameters values on the display. If these values are significantly different from the control blood expected values, repeat the procedure and if they are still different, proceed with the calibration of the instrument. For this calibration follow this procedure: - Press the «CAL» key. A led will appear on the display on the right side of the note Hgb. Now you are in the calibration program. Press the «CAL» key in case it is wanted to proceed with calibration of the other parameters. - By using the « » or «¯» keys it is possible to increase or decrease the present Hgb value, until reaching the expected value. Press the «CAL» key to confirm the change done and proceed directly to the following parameter. - Press «SAMPLE» or «ENTER» to exit from the calibration program. While working, the instrument could display some errors of capillary obstructions or instability in the haemoglobin reading: these problems exist because of the presence of impurities in the hydraulic circuit. The following procedure must be performed for instrument washing. 7.1 CAPILLARY WASHING PROCEDURE If the instrument, at the end of a reading cycle, displays errors due to the capillary (partial or total obstruction, air bubbles etc…), perform the following steps: 2. Perform capillary washing as follows. Take out the cup placed under the capillary and press the CLEAN key. The display will show the message: “PUT AN EMPTY CUP AND PRESS A KEY. Execute the procedure by pressing CLEAN key again. Eventually the instrument will show the message PUT A FILLED CUP AND PRESS A KEY. Now the reading can be repeated. 3. For a better cleaning we suggest to perform another CLEAN procedure: in this case do not follow the instruction PUT A FILLED CUP AND PRESS A KEY and instead, press the CLEAN key to repeat the capillary cleaning. At the end of this cycle, place a cup with isotonic solution under the capillary and repeat the reading. 4. Fill a cup with sodium hypochlorite (17% concentrated), place it under the capillary and press the CLEAN key for few seconds, until INSIDE FILLING appears on the display: the instrument automatically starts a capillary and hydraulic circuit cleaning cycle. At this time, the operator can decide if further INSIDE FILLING cycles are necessary. When the INSIDE FILLING is finished, take the cup with sodium hypochlorite out. Press the CLEAN key 2 or 3 times in order to eliminate the sodium hypochlorite from the capillary. Afterwards place a new cup with isotonic solution under the capillary and press the SAMPLE key (the sodium hypochlorite present on the capillary walls is collected by the isotonic solution). In this step, do not take into consideration the results of the measurement. Then, read a cup filled with clean isotonic solution. 5. Repeat the operation described in 4, leaving the cup filled with sodium hypochlorite under the capillary for about 1 hour. After this, proceed with the operations described. 7.2 HGB GROUP WASHING PROCEDURE If during the CHECK error 31 occurs (non repeatable Hgb) or the operator notes a bad repeatability for haemoglobin readings during his work, follow this procedure. 1. Place a cup of isotonic solution under the capillary, leaving in the air the teflon tube for the haemoglobin reading. Put a cup of sodium hypochlorite (17% concentrated) under this tube as shown in the picture, and make 3 or 4 reading cycles; in this way the haemoglobin tube will aspirate sodium hypochlorite. In this step, do not take into consideration the results of the haemoglobin measurement. 2. Take the cup with sodium hypochlorite out and leave the teflon tube in the air. Then, make 3 or 4 readings: in this way the tube will aspirate air eliminating the sodium hypochlorite. 3. Insert the haemoglobin tube in the cup filled with isotonic solution placed under the capillary again. Working in WBC mode, press the SAMPLE key. 4. Perform a CHECK using new isotonic solution. 5. Repeat the procedure described in step 1, leaving the cup filled with sodium hypochlorite under the tube for 1 or 2 hours. Make sure that in this phase the teflon tube is completely filled with sodium hypochlorite, without air bubbles. Proceed as described in steps 2, 3 and 4: repeat the CHECK and test again the haemoglobin measurement. 6. Call the service department. 7.3 DETERGENT SOLUTION WASHING PROCEDURE Sometimes, it is a good rule to perform a washing of the capillary and its hydraulic circuit, using detergent solution. - Fill a cup of detergent solution and put it under the capillary. - Repeat this operation 2 or 3 times. Now the instrument can be switched off if the working session is finished or some measurements with isotonic solution are wanted to be repeated. Remember that the first readings can be conditioned by the previous use of the detergent solution. In this part the procedures to follow if the instrument remains inactive for a short or a long period are described. 7.4.1 Daily working session closing At the end of a working day it is recommended to perform the following procedure before switching the instrument off. - Place a filled cup with isotonic solution under the capillary, inserting the haemoglobin tube into it too; - Make 2 or 3 reading cycles, pressing the SAMPLE key. If readings are high, repeat the procedure. If the instrument will be used the following day: - Place a new cup filled with isotonic solution under the capillary, inserting the haemoglobin tube into it as well and switch the instrument off. If the instrument will be inactive for few days: - Place a filled cup with distilled water under the capillary, inserting the haemoglobin tube into it too and switch the instrument off. If the instrument will be inactive for a long time (more than a week) or will be sent to another place this procedure should be performed by following these steps: Substitute the isotonic solution tank with a distilled water one, insert its tube into the IN connection. - Press the key for the diluter aspiration +/- 10 times, in order to completely fill the diluter with distilled water. - Place a filled cup with distilled water under the capillary, inserting the haemoglobin tube into it too. - Make 4 or 5 reading cycles with distilled water pressing the SAMPLE key. In this step, do not take into consideration the measurements results. - Remove distilled water from the IN connection. - Press the key for the diluter aspiration +/-10 times until the hydraulic circuit of the diluter is empty. - Perform some SAMPLE cycles without a cup under the capillary, in order to allow entrance of air into all of the hydraulic circuit until it is empty. In this step, do not take into consideration the measurements results. - When the instrument is completely drained, switch it off. - Unscrew the capillary and put it into its bottle, screw the ring nut on the capillary holder. - Disconnect the peristaltic pumps red tubes from their slots. Now the instrument is ready to be transported or to remain inactive for a long time. Use the packing material to protect the instrument during its transport. In case of malfunction, the instrument displays error (err) or warning (wrn) messages. These messages are described with the indications of the possible causes and solutions. In case of persistent error or warning messages, also after the execution of the suggested indications, call the service department. Hgb reference value out of range in CHECK mode Maybe there is no aspiration of the solution from the haemoglobin tube -Make sure the haemoglobin peristaltic pump works and check the peristaltic pump tube as well -Make sure the Hgb tube is inserted in the cup Occurs when the SAMPLE key is pressed during the sample reading Press the SAMPLE key to start another reading Air bubbles in the RBC reading glass tube See washing capillary procedure (par 7.1). Too short counting time in RBC capillary -Air aspiration in RBC/Plt capillary -Leaks in the hydraulic circuit - Fill the cup under the RBC capillary Too long counting time in RBC/Plt capillary Partial obstruction in RBC capillary See washing capillary procedure (par 7.1). Total obstruction in RBC/Plt capillary Clogged RBC capillary caused by impurity or air bubbles See washing capillary procedure (par 7.1). Air bubbles in the RBC reading glass tube See washing capillary procedure (par 7.1). Lack of instrument initialisation -Check the presence and the level of the isotonic solution in the tank -Try to switch the instruments off and then on Air bubbles in the WBC reading glass tube See washing capillary procedure (par 7.1). Too short counting time in WBC capillary - Air aspiration in WBC capillary - Leaks in the hydraulic circuit - Fill the cup under the WBC capillary Too long counting time in WBC capillary Partial obstruction in WBC capillary See washing capillary procedure (par 7.1). Clogged WBC capillary caused by impurity or air bubbles See washing capillary procedure (par 7.1). Air bubbles in the WBC reading glass tube See washing capillary procedure (par 7.1). Lack of instrument initialisation -Check the presence and the level of the isotonic solution in the tank -Try to switch the instrument off and then on Air leakage in the vacuum circuit Hgb measure not repeatable in CHECK mode -No correct aspiration from haemoglobin tube -The Hgb hydraulic circuit is polluted See haemoglobin group washing procedure (par 7.2). High background count in CHECK mode -Polluted isotonic solution tank or diluter -Check the isotonic solution pollution making a measure with solution directly taken from the tank; if the warning message still appears replace the isotonic solution tank -Clean the diluter around 10 times with detergent solution (then clean the diluter around 10 times with isotonic solution) -Check the ground connection. Make sure the power plug is connected to a grounded AC wall outlet (preferably not shared with other electric appliances) and with less than 10% fluctuations in the line voltage compared with the standard voltage specified. Excessive voltage fluctuation requires a surge protector. If your AC main line has not a ground connection or has a ground line not efficient, connect a copper wire from the connecting terminal in the rear panel to any point at the ground electric potential. -There may be some electric interferences. Keep the instrument away from other appliances generating high electric noise (i.e. radiological instrument, etc…). -Problems about counting sensor -Capillary partial obstruction -Macrobubbles with MCV value increasing - Repeat the reading; if the problem persists perform CLEAN procedure -Check the grounding connection Poor RBC/Plt separation, too much Plt near the upper threshold, suspect Plt graph -Working with a pathological sample blood >550 thousands for a sample reading or >50 thousands for an isotonic solution reading -Check the grounding connection -Check if the isotonic solution is polluted |